Appearance
Managing Users
In this article, you will find the essential information you need for understanding the management of users and roles in Rapid.
Users & Roles
In this article, you will find the presentation of details for adding, editing, and removing users in your installation of Rapid.
In this article, you will find the presentation of details for adding, editing, and removing roles in your installation of Rapid.
In the presentations of the user experience/interface, you will see examples of users, roles, and settings: your station(s) will be setup differently when compared to the examples in this article.
HOME | Overview
Consider this example of a user experience in Rapid with five stations on the page named “HOME | Overview”.
.Cfw2E6_8.webp)
From the navigation menu, in the SYSTEM group, select User Management.
User Management | Users Tab
At the top of the page, select the tab named Users.
.DIQJuFRh.webp)
Familiarize yourself with the page for Users.
- In the Users page, the blue button named (+ Add User) is used to add users to your Rapid
- When users have been added to your Rapid, select a user from the list of Users and view the information to the right
- When users have been added to your Rapid, for the selected user, the Edit button is used to change the setup for the user
User Management | Roles Tab
At the top of the page, select the tab named Roles.
.CHevUa2U.webp)
Familiarize yourself with the page for Roles.
- In the Roles page, the blue button named (+ Add Role) is used to add roles to your Rapid
- When roles have been added to your Rapid, select a role from the list of Roles and view the information to the right
- When roles have been added to your Rapid, for the selected role, the Edit button is used to change the setup for the role
** Roles & Account Types **
- As you will encounter in Rapid, for these account types --- Super Users and User Admins --- role assignments in the user setup are not required
- As you will encounter in Rapid, for this account type --- User --- role assignments in the user setup are indeed required, and some planning is recommended as you add and setup roles in your Rapid
User Management | Add Role
In the page for Roles, select the blue button named (+ Add Role) and observe the dialog named Add Role.
.DTFd4dZz.webp)
In the dialog, key in the details:
- Name: Key in a name for the role of interest
- Description: Key in a description for the role of interest
- Permissions: Select the Edit button to access the dialog named Add Permissions
- Users: Select the Edit button to access the dialog named Add Users
dialog, Add Permissions
Select the Edit button to access the dialog named Add Permissions.
Choose the permissions for the role of interest and then select OK.
.B4ufpZ_E.webp)
dialog, Add Users
Select the Edit button to access the dialog named Add Users.
Choose the users for the role of interest and then select OK.
.uWbaoiVc.webp)
When you return to the dialog named Add Role, select Save.
With each role that you add/save to your Rapid, the list of roles will be presented in the Roles tab on the page for User Management.
List of Roles
As you add and setup roles in your Rapid, the Roles tab on the page for User Management will present a searchable list of roles.
.D_uJixob.webp)
- Select a role and view the role information to the right
- Select the vertical ellipsis (role change menu) to edit or delete a role from the setup in Rapid
- Select the Edit button to make changes to the chosen role of interest
User Management | Add User | Super User
In the page for Users, select the blue button named (+ Add User) and observe the dialog named Add User.
Select the account type named Super User.
.YOxqe2_p.webp)
For the account type known as Super User, key in the details:
- Create/change the name for the user of interest
- Create/change the username for the user
- Create/change the password for the user Super User has administrator access to all sections of Rapid.
Select Save.
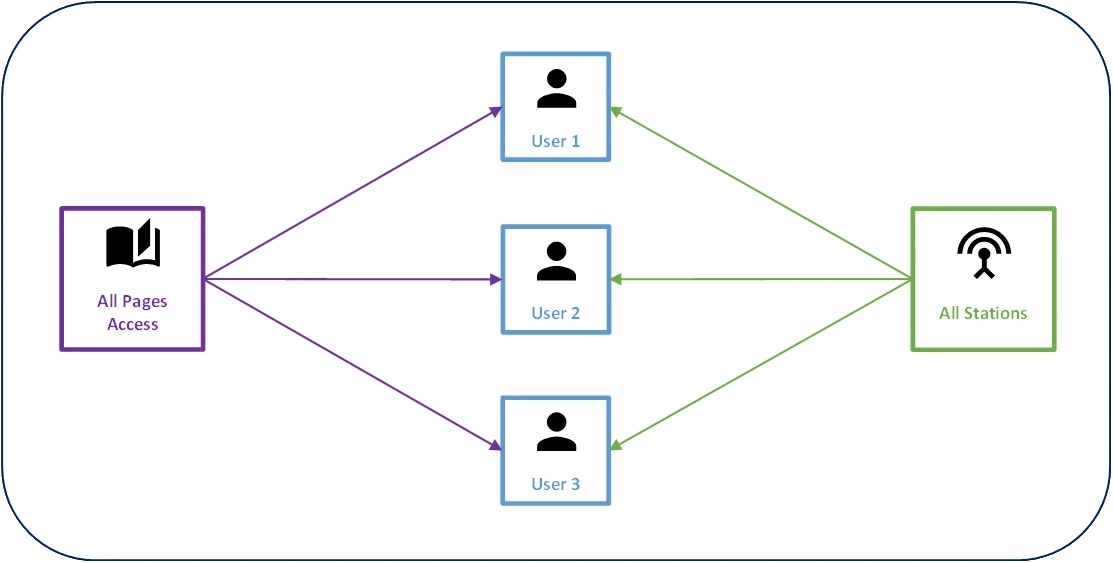
Managing Users | Super User
Super User Account | Users & Roles | How they work together
User Management | Add User | User Admin
In the page for Users, select the blue button named (+ Add User) and observe the dialog named Add User.
Select the account type named User Admin.
.le1-tfdJ.webp)
For the account type known as User Admin, key in the details and make your selections.
- Create/change the name for the user of interest
- Create/change the username for the user
- Create/change the password for the user User Admin has administrator access to the User Management section of Rapid: additional access rights can be configured in this dialog.
- Roles: Select the “Edit” button to add a role for the user of interest Select Save.
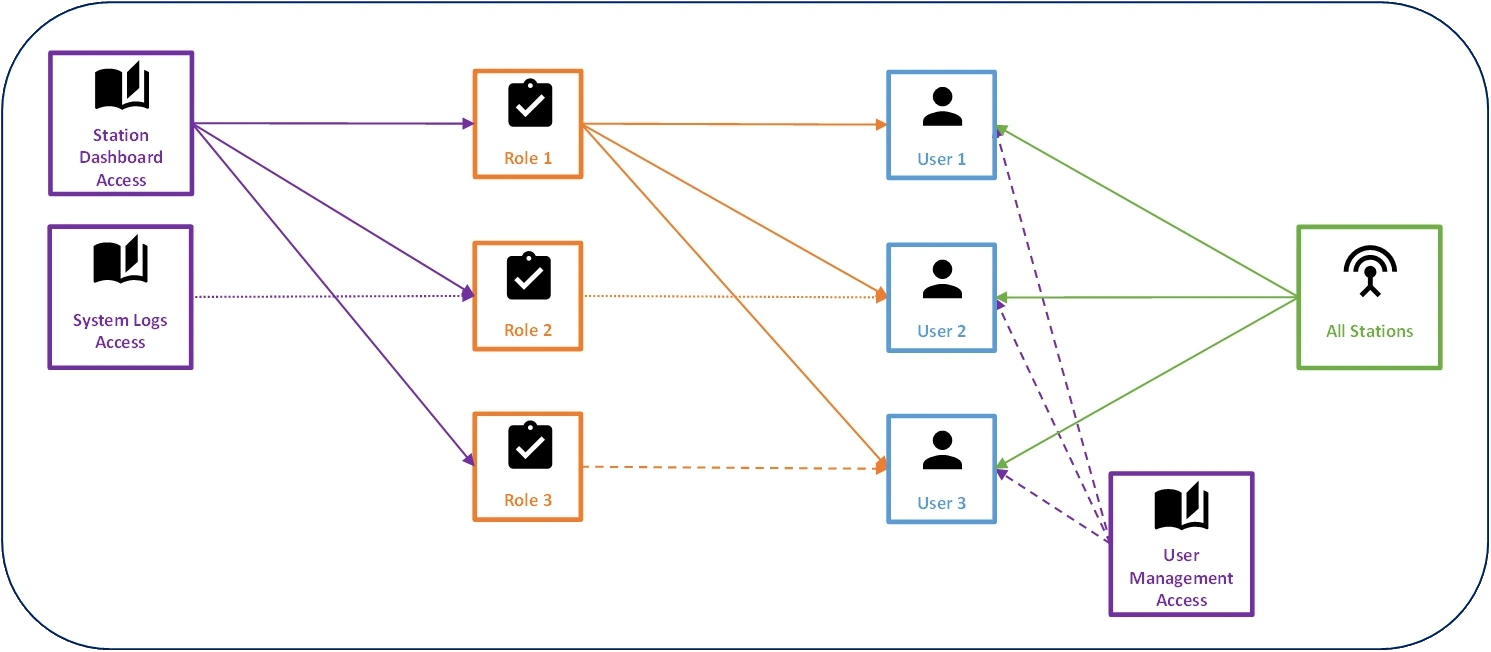
Managing Users | User Admin
User Admin Account | Users & Roles | How they work together
User Management | Add User | User
In the page for Users, select the blue button named (+ Add User) and observe the dialog named Add User.
Select the account type named User.
.CWSiK0gi.webp)
For the account type known as User, key in the details and make your selections.
- Create/change the name for the user of interest
- Create/change the username for the user
- Create/change the password for the user User will have all access rights configured in this dialog
Roles: Select the “Edit” button to access the dialog of roles then return to the dialog
Stations: Select the “Edit” button to access the dialog of stations then return to the dialog
After configuring the access rights for the User, select Save.
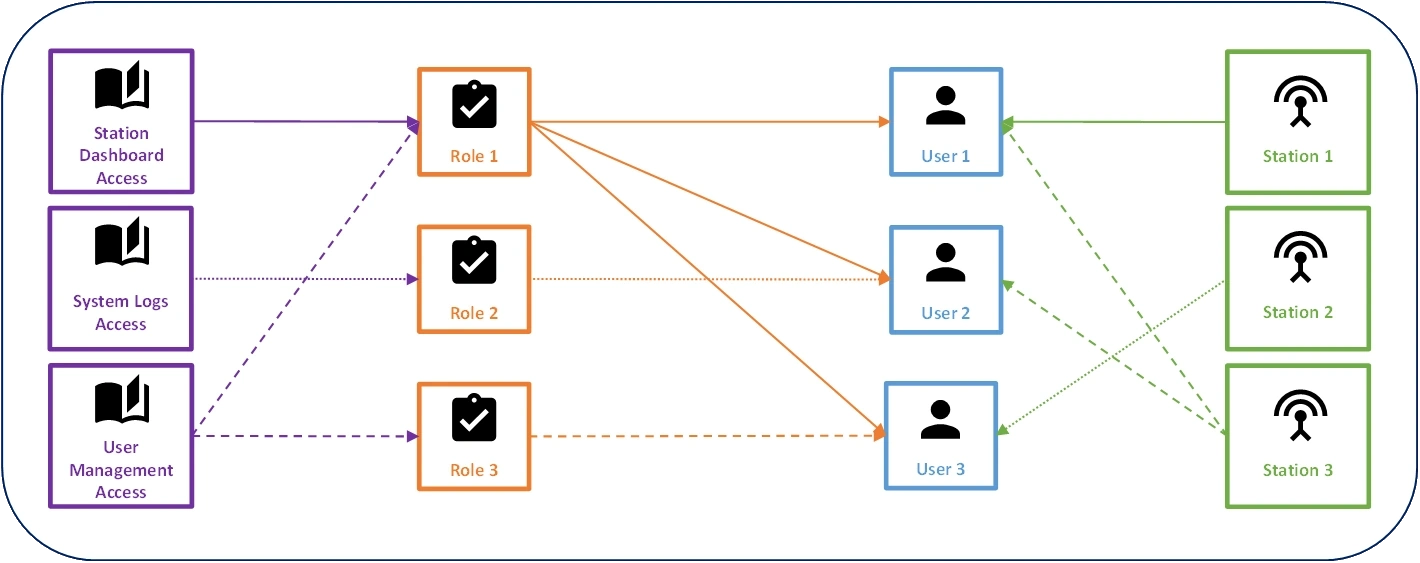
Managing Users | User
User Account | Users & Roles | How they work together
List of Users
As you add and change users in your Rapid, the Users tab on the page for User Management will present a searchable list of users.
.BeI1Ls5r.webp)
- Select a user and view the user information to the right
- Select the vertical ellipsis (user change menu) to edit or delete a user from the setup in Rapid
- Select the Edit button to make changes to the chosen user of interest
v490/1